Last Updated on April 25, 2024 by admin
Are you looking for cheap, fast way to send and receive money abroad . i guest you are only familiar with Western Union, Money Gram and other methods. today you will learn about Wise is formerly known as wise, which is an innovative peer-to-peer money transfer platform that’s completely changing the way people send money abroad.
Unlike most other transfer services, our unique online platform lets you transfer money directly to another person’s bank account. We use real exchange rates, so you can pay in your home currency and get the local currency for free. The online money transfer is different from traditional banks because it doesn’t have foreign exchange branches or employ foreign currency traders. This makes the process cheaper and faster, whilst insuring that costs are always transparent and predictable.
• How does Wise work?
Here’s a breakdown of how Wise (formerly TransferWise) works:
1. Peer-to-Peer Currency Matching:
- Instead of directly converting currencies at unfavorable rates, Wise uses a peer-to-peer system.
- If you’re sending USD to EUR, Wise matches your transfer with someone sending EUR to USD. This eliminates the need for multiple currency conversions, saving money on fees.
2. Mid-Market Rate:
- Wise offers the mid-market exchange rate, which is the real, midpoint rate between buy and sell prices in the global currency market.
- Traditional banks often add a markup on top of the mid-market rate for their profit – Wise doesn’t. This translates to a fairer, more transparent exchange rate.
3. Local Bank Transfers:
- Wise maintains bank accounts in various countries around the world.
- You send money from your bank account to Wise’s account in your country.
- Wise then sends money from their account in the recipient’s country to the recipient’s bank account.
- This process minimizes the time and costs typically associated with international transfers.
Example:
- You want to send $1000 from the US to the UK.
- Wise matches your transaction with someone sending pounds to dollars.
- Wise uses the real mid-market exchange rate, plus a small transparent fee.
- You send $1000 to Wise’s local US bank account.
- Wise sends the equivalent amount of pounds from their UK account to your recipient’s bank account.
Benefits of using Wise:
- Fast Transfers: Transfers often complete within a day or two.
- Low, Transparent Fees: Wise’s fees are significantly lower than those of most banks.
- Mid-Market Exchange Rate: You get the fairest exchange rate.
- Secure: Wise uses rigorous security to protect your money and information.
• How to Register an account with Wise.
Registering for a Wise account is quick and easy! Here’s how:
Through the Website:
- Visit the Wise website
- Click “Register” (or “Sign Up”): Usually located in the top-right corner of the website.
- Choose Account Type: Select “Personal Account” or “Business Account” depending on your needs.
- Provide Email and Password: Enter your email address and create a strong password.
- Select Country: Choose your country of residence.
- Verification: Wise may ask you to verify your identity by providing ID documents and a selfie. This is a standard security measure.
Through the Wise App:
- Download the App: Search for “Wise” in the App Store (iOS) or Google Play Store (Android) and install the official app.
- Tap “Create Account” (or similar): The option may vary slightly depending on the app version.
- Follow the Same Steps: Similar to registering through the website, you’ll provide your email, password, country, and might go through identity verification.
Important Things to Note:
- Verification: Be prepared to upload a valid ID (passport, driver’s license, etc.) during registration for verification purposes.
- No Charges: Creating a Wise account is free. You’ll only be charged when you make a transfer or use other Wise services.
Once registered, you’ll be able to:
- Send money internationally.
- Get paid in various currencies.
- Hold and spend money in multiple currencies with the Wise debit card.
• How to Transfer money using Wise
Transferring money with Wise is a straightforward process. Here’s a step-by-step guide:
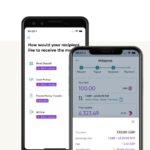
1. Go to ‘Send’
From the Home screen, select Send.
2. Choose where you want to send from
You can fund your transfer from either an account outside Wise or use available money on your Wise balance.
3. Enter how much you’d like to transfer
Select either the amount you’d like to send, or exactly how much you’d like your recipient to get, and chose the currency
Let us know who you’re sending money to
You can search for an existing recipient from your list by typing the name, Wisetag, email or phone, or scrolling down the list.
If it’s not an existing recipient, you can add one manually by clicking Add a recipient.
Add a new recipient
Select if you’re sending to yourself, someone else, or a business.
If you have their bank details, check the box and add them in — we’ll send money to that account.
If you don’t have their bank details, just enter their email address.
- If they have an account with Wise, we’ll find the account they want to receive money into.
- If they don’t have an account with Wise, we’ll send them an email asking for their bank details.
5. Review the details of your transfer
Make sure everything looks right. You can add a reference for your recipient if you’d like.
6. Choose how to pay
The confirmation screen lets you check the details — your money isn’t sent at this point.
There are multiple ways you can pay for your transfer. We’ll let you know the fees for each option, and how long it should take for the money to arrive.
It’s often cheapest to pay from your bank account. This means you’ll have to go to your online banking or your branch and send the money to Wise from there.
7. That’s it!
After wise received your money, you will confirm the transfer via email or in the app. And they also let you and your recipient know when the money’s on its way.
Your payments will appear under Transactions on the home screen, and you can even change the category from a drop-down list right under the amount, to keep your payments organised.
Note: Wise charges a little fee on every transaction made, depending on how much you want to transfer and it also varies from currency to currency.
• How to receive payments through Wise
You can receive money by:
- Sharing your bank account details
- Requesting payments
- Receiving to your Wise card, or email address.
1. Receive money by sharing your bank account details
Receiving money to these details works just like a regular transfer. Just share your Wise account details with the person or business who wants to pay you.
You’ll receive their payment directly into that balance in your account — you’ll see it under Transactions.
Fees, limits and payment methods
- USD domestic and Swift wires which cost 4.14 USD to receive per transaction
- CAD Swift payments which cost 10 CAD to receive per transaction
- There’s no limit for how much you can receive to your different currency accounts right now, with the exception of US dollars.
- Wise doesn’t accept cash or cheque payments.
What currencies can I receive?
You can get account details in USD, GBP, EUR, AUD*, NZD, MYR*, CAD, HUF, RON*, TRY* and SGD balances — with more currencies on the way.
For all currencies except GBP, you can only receive payments in the same currency as your account details, so make sure you select the right currency and account details for the payment.
GBP global account details can receive 17 different currencies without any additional fees.
How do I get account details?
- Go to Home.
- Scroll to the far right and Select Open.
- Select Balance.
- Choose one of the currencies that has account details.
- Once you have the balance opened, click on the account details you see just under the currency — this will take you to the full list of details.
If it’s the first time you’re getting account details, you might need to complete some requirements first.
*Exceptions
- AUD: Australian customers — learn more about PDS/FSG.
- MYR account details are only available if you’re a resident in Malaysia and only supported for personal accounts
- RON account details are only available for residents of the EEA, Switzerland, the US, Canada, Australia, and Japan.
- TRY can only be received by customers whose address is not in Türkiye.
- PLN account details are currently not available.
- EUR: in August 2020, we replaced our old EUR account details for new ones that start with BE.
2. Receive money by requesting a payment
If you have a personal account, you can receive money by requesting a payment:
- directly from your friends on Wise if you sync your contacts
- from anyone, using a payment link
To do this, you need to open a balance for the currency you’re requesting.
If you have a Wise Business account, you can also choose how to be paid — straight from your customer’s Wise account, by bank transfer, or by card.
3. Alternative ways to receive money
- Receive to your Wise card details — receive money by using your 16-digit card number
- Receive from friends that use Wise — sync your phone contacts so they can find you
- Receive by giving the sender your registered email address
• How to track payments on Wise
For every transfer you set up, Wise try to give you as much information as possible in their money tracker. It’s so you can see where your money is at every step. To check the money tracker:
- Log in to your Wise account
- Click Details on the transfer you’d like to track
FAQs
Q: What is Wise Money Transfer?
A: Wise (formerly TransferWise) is a money transfer service that allows you to send and receive money internationally at competitive exchange rates and lower fees compared to traditional banks.
Q; What types of documents does Wise accept?
A: A valid ID can be:
- Passport (photo page only)
- National ID card (we only accept the most recent version of the Nigerian national ID card)
- Photo driving license
A valid proof of address document can be:
- Utility bills: gas, electric, or landline phone (no mobile phone bills)
- A bank or credit card statement (photo/scan of a physical letter or PDF of statement)
- A council tax bill, or a HMRC notification
- Vehicle registration or tax
- Photo driving licence showing your address and expiry date
- Any other government or financial institution-issued document
Source: Wise money Transfer
For Advertisement, Content marketing andsponsored post: contact : kokobest04@gmail.com
- How to Contact wellsfargo Customer Service - May 24, 2024
- PayVIS: New Lagos State platform for paying traffic offense and penalties - May 1, 2024
- How to transfer money from UBA - April 22, 2024